🍄 How to Use Liquid Culture to Inoculate Grain Substrate
Once you’ve successfully grown or purchased a healthy liquid culture – such as a Gourmet Mushroom Liquid Culture Syringe from Luna’s Creation Shop – you’re ready for the next step: inoculating grain substrate.
This step is where your mushroom mycelium transitions from living in a nutrient liquid to spreading across a solid, nutrient-rich medium like rye berries, millet, or wheat. The process is surprisingly simple and offers some serious benefits over traditional agar or spore inoculation techniques.
🌾 What Is Grain Substrate?
Grain substrate serves as a nutritious food source for mushroom mycelium to colonize before it’s mixed into a larger “bulk” substrate (like sawdust or fuel pellets). Common grain types include:
Rye berries – great for most gourmet mushrooms
Millet – excellent for fast-growing species
Wheat or brown rice – affordable and easy to find
Oats or sorghum – good for large-scale or experimental grows
Grain provides a perfect combination of nutrients, moisture, and surface area, allowing mycelium to spread quickly and evenly.
💉 Why Use Liquid Culture Instead of Agar or Spores?
If you’ve ever used agar plates or spore syringes, you know they can be time-consuming and more prone to contamination. Liquid culture simplifies the process dramatically:
| Method | Pros | Cons |
|---|---|---|
| Agar Culture | Great for strain isolation | Requires sterile transfers, lab tools, and skill |
| Spore Syringe | Easy to store | Slower colonization, unpredictable genetics |
| Liquid Culture | Fast, clean, consistent | Needs a sterile base and proper storage |
Here’s why liquid culture inoculation stands out:
It already contains live, active mycelium that’s ready to grow.
The syringe delivery system allows for quick, sterile injection.
Mycelium colonizes grain up to twice as fast compared to spores.
Minimal handling means fewer chances for contamination.
Simply put, liquid culture gives you a head start – skipping the germination stage entirely.
🧪 What You’ll Need
Before you begin, gather your supplies:
1 or more sterilized grain jars or bags (rye, millet, or oats)
10 mL Gourmet Mushroom Liquid Culture Syringe
Alcohol wipes or 70% isopropyl alcohol spray
Gloves and mask for sterile handling
Still air box or clean workspace
Optional but helpful:
Flame sterilizer or alcohol lamp for the syringe needle
Parafilm or tape to seal injection sites
🔬 Step-by-Step: How to Inoculate Grain with Liquid Culture
Step 1: Prepare Your Work Area
Clean your workspace thoroughly. Wipe down all surfaces with alcohol and wash your hands. Ideally, perform this in a still air box or near a laminar flow hood to minimize contamination.
Step 2: Sterilize the Needle
Flame-sterilize the tip of your syringe needle until it glows red. Let it cool for a few seconds before injecting.
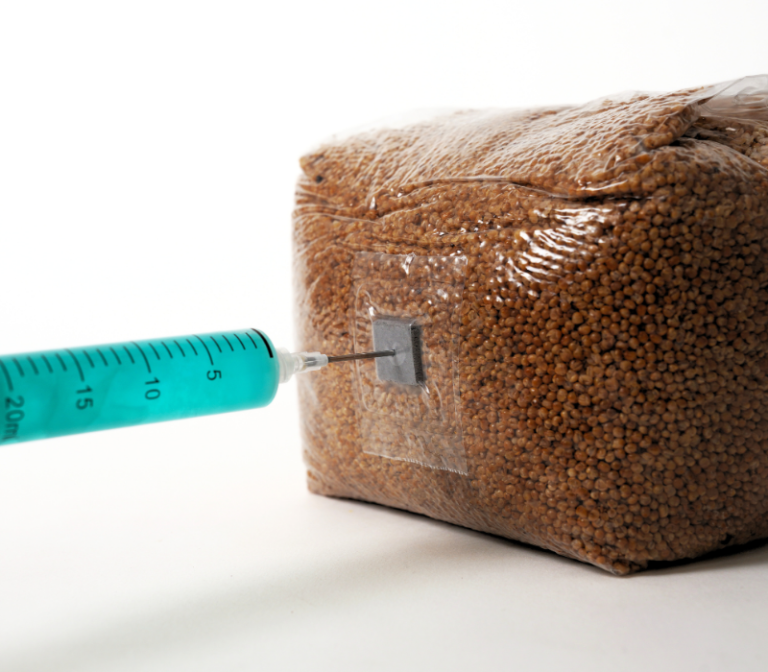
Step 3: Inject the Liquid Culture
Shake your syringe gently to mix the mycelium evenly.
Insert the needle into the jar or bag’s self-healing injection port.
Inject 1–2 mL of liquid culture into each jar.
If your jar doesn’t have an injection port, loosen the lid slightly, inject near the side of the glass, and re-tighten.
Step 4: Mix (If Applicable)
If your grain container is a bag, you can gently mix the grains to help spread the mycelium evenly. For jars, it’s best to leave them undisturbed until you see some growth.
Step 5: Incubate
Place your inoculated jars or bags in a dark, warm place (70–77°F / 21–25°C).
After 3–5 days, you’ll start to see white patches of mycelium spreading from the injection points.
Step 6: Shake to Distribute
When the mycelium has colonized about 30% of the grain, shake the jar gently to redistribute it. This helps the mycelium spread evenly, leading to faster full colonization.
🌱 Signs of a Healthy Inoculation
Bright white mycelium spreading evenly
No unusual colors (green, yellow, or black spots = contamination)
A pleasant earthy smell, not sour or musty
Within 2–3 weeks, depending on temperature and grain type, your jars should be fully colonized and ready to spawn to a bulk substrate.
⚡ Pro Tips for Success
Always wipe the syringe port before and after injection.
Store unused liquid culture syringes in the fridge to preserve mycelium health.
Label jars with species name and inoculation date for tracking progress.
Avoid excessive shaking early on – it can slow recovery.
🌾 Ready for the Next Stage?
Now that your grain substrate is fully colonized, you’re ready to move on to Part 3 – where we’ll cover how to mix your colonized grain into bulk substrate (like sawdust or fuel pellets) to start growing your own gourmet mushrooms at home.
This final step transforms your hard work into a fruiting environment where mushrooms thrive naturally and abundantly.